
Toledo Bend Seawall Failure – built by Ricky Hobbs circa 2010
Toledo Bend Seawall failure. Hopefully your Toledo Bend seawall will never look like this. I am writing this article to give people an idea of what it is like to deal with seawall failures, building seawalls, and rebuilding seawalls on Toledo Bend Lake. While I do hold a degree in Chemical Engineering, I am by no means a structural engineer or geological engineer, nor am I certified to give advice on soil foundations. Everything henceforth is my opinion gained through hardship and experience. I hope that people can learn from my experience so they won't have to go through what I've been through.
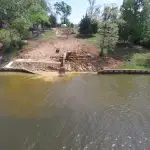
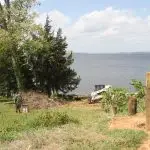
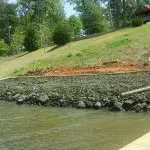
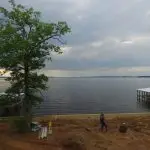
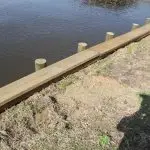
Back in 2016 I bought this beautiful piece of lakefront property on Toledo Bend Lake. Aside from the incredible view, one of the things I really liked about the property is that it has a seawall on it (or had a seawall on it). I was told the seawall wasn't that old and likely had plenty of life left in it. Here are the pictures of my seawall when I bought it in November 2016. You can click on any of the images in this report to see a larger picture:
-
- Toledo Bend Seawal before failure
-
- Toledo Bend Seawal before failure
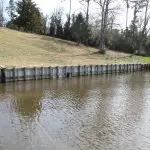
The entire stretch of seawall in the picture was build by Ricky Hobbs, who has built a number of seawalls around Toledo Bend Lake. You might notice that the portion of the seawall in the center-left section of the pictures has already failed. To patch the failure rip-rap (rip-rap is big rocks) was poured onto seawall to slow the erosion process. This failure is on my neighbors property while my property is located just to the right of his. I spoke to my neighbor about his failure, and he complained to me that Ricky Hobbs would not stand behind his work and repair the seawall. I also spoke to Ricky Hobbs who expressed to me that the reason for the failure was because my neighbor insisted on using substandard building materials in an effort to cut costs. Both my neighbor and Ricky Hobbs are at odds with each other over who is at fault and whose responsiblity it is to repair the damage. I suppose my neighbor is the loser in this dispute because there's not much he can do to get Ricky Hobb's help in fixing his seawall, aside from entering into a legal dispute which may or may not pan out.
Shortly after I bought my property, and after speaking to Ricky Hobbs about his dispute with my neighbor, Ricky reassured me that my portion of the seawall was built with materials of Ricky's choosing. According to Ricky Hobbs the owner before me did not try to cut costs with substandard building materials. At this time I expressed an interest in building a boathouse extending out from my property. Ricky Hobbs asked me to draw a sketch of the boathouse I wanted to build and email it to him. I emailed it to him, and never got a response. I shrugged this off as a possible oversight. I wasn't in a hurry anyway, and I told myself I would follow up with Ricky later. Little did I know this non-response is a habit of sorts with Ricky Hobbs. People I talked to had already warned me that Ricky was bad about getting back to people even when he gives his word that he will. I would find this out for myself at a later date, for sure.
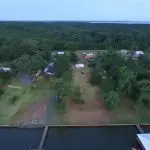
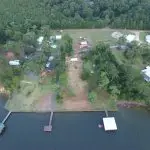
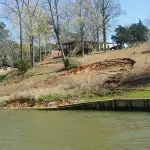
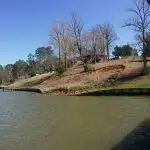
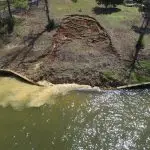
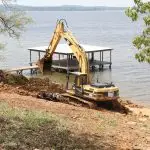
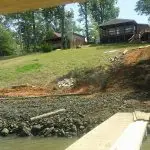
On March 1, 2018 I was contacted by my neighbor advising me that my seawall had just had a catastrophic failure. He sent me these pictures depicting the damage:
-

- This is the picture my neighboar sent me of the seawall breach – March 1, 2018
-
- This is the picture my neighboar sent me of the seawall breach – March 1, 2018
-
- This is the picture my neighboar sent me of the seawall breach – March 1, 2018
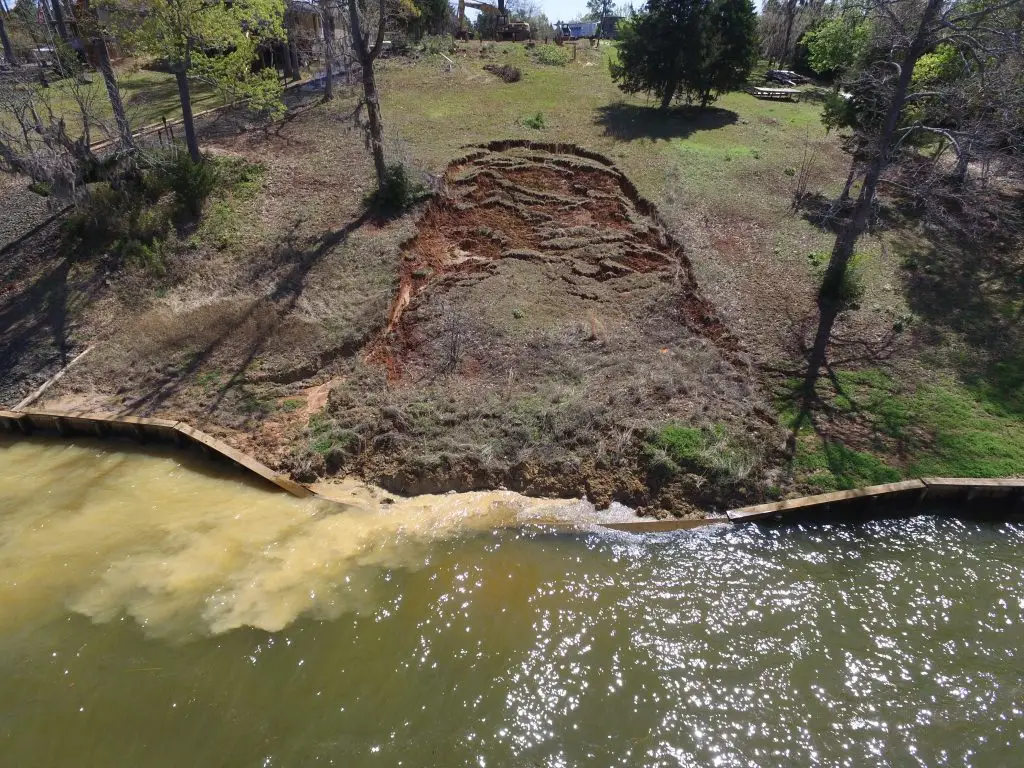
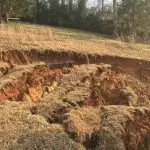
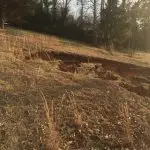
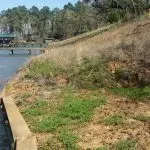
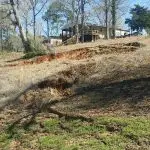
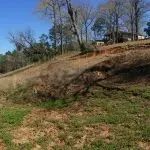
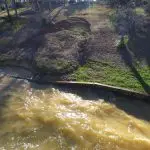
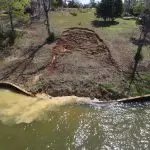
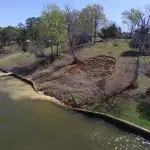
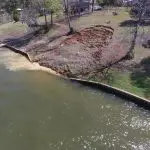
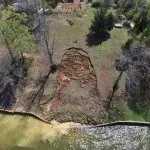
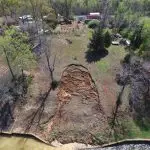
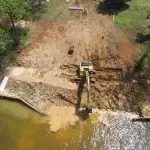
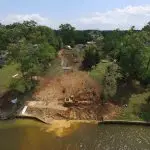
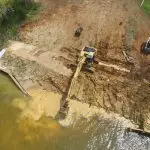
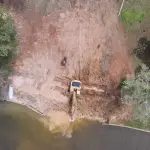
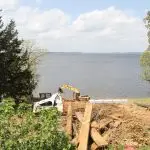
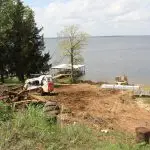
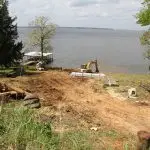
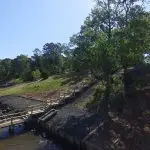
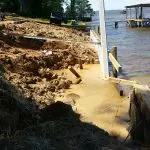
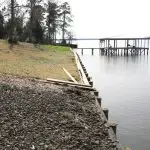
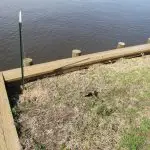
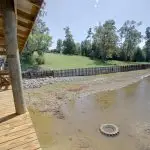
On March 3, 2018 I was able to travel to my property and get some pictures of my own. Upon my arrival I discovered that the breach was about 50 feet wide and about 75 feet into my property. I stood ont he edge of the cracks and observed that this thickness of the part that slipped is about 3 to 4 feet. The entire piece of land lost grip and slipped as if it were sliding on one of those vinyl slip n' slides. The slip interface was at the exact point where the red clay turns into a grey fatty clay. In my opinion when the dirt was put there circa 2010 it should have been churned with the existing dirt to disrupt this interface. When the seawall was built circa 2010 the backfill dirt was dug out of the lake bed because the level was dropped that year. This backfill dirt is what slipped on the red clay / fatty grey clay interface.
-

- Toledo Bend Seawall Failure – March 3, 2018
-
- My first visit to the seawall failure – March 3, 2018
-
- My first visit to the seawall failure – March 3, 2018
-
- Toledo Bend Seawall Failure – March 3, 2018
-
- Toledo Bend Seawall Failure – March 3, 2018
-
- Toledo Bend Seawall Failure – March 3, 2018
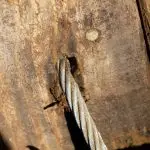
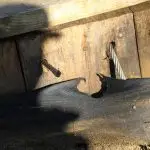
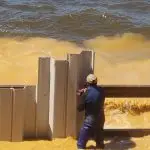
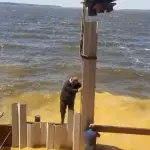
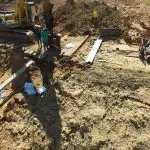
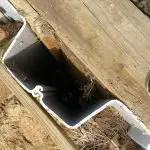
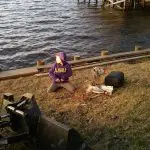
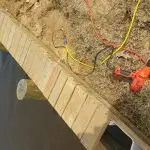
I left the property and returned on March 7, 2018. Before returning I spoke with an Architect, a Geotechnical lab, and a pile driving company who specializes in building seawalls. All three were of the same opinion that the recent rains triggered the event, which is likely a weak spot in the seawall. Upon my return on March 7 I looked for clues. I didn't find just clues, but I found answers. Seawalls consist of pilings driven into the ground with a wall driven behind them. To help support the seawall a second set of pilings are located 10 to 20 feet behind the wall and driven into the dry ground. Tension cables that stretch from the front pilings to the back pilings are used to make the two sets of pilings work as a system. The tension in the cables is vital to the performance of the entire seawall system. Here is a picture that shows what I'm talking about with the two sets of pilings connected with cables. The image you see here are what it looks like just before the cables are tightened and held with fasteners. Once the cables are tight all of it is covered in backfill dirt.
seawall support pilings connected with tension cables
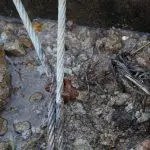
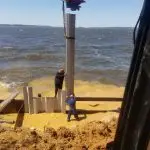
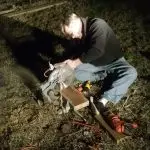
Now look at my video and pictures from March 7, 2018. You will notice that my exposed cables are loose. The cables are loose because the fasteners that are supposed to secure them have corroded and deteriorated in the short 8-year lifespan of this seawall. In fact in the video at the 1:10 mark you'll see me flick off a chunk of the fastener with my bare fingernail! The fastener appears to be made of carbon steel. Not only is it exposed to the elements not friendly to carbon steel, but it is also attached to stainless steel cable, a dissimilar metal. Dissimilar metals react with each other and corrode faster than they would in the presence of simliar metals.
-
- Loose cable that gave way because of fastener failure – March 7, 2018
-
- Loose cable that gave way because of fastener failure – March 7, 2018
-

- Corroded and deteriorated cable that failed and caused my seawall to breach – March 7, 2018
-

- Corroded and deteriorated cable that failed and caused my seawall to breach – March 7, 2018
-
- Corroded and deteriorated cable that failed and caused my seawall to breach – March 7, 2018
-
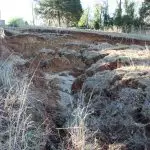
- A view of the failure interface. Look at how the red clay slipped on the fatty grey clay at the interface – March 7, 2018
-
- While the slipped soil continues to slide and cause more damage to my seawall, the perimeter of the failure is unchanged from March 1 to March 7
-
- Rough waters at the seawall erode the soil quickly when there is no seawal to protect it – March 7, 2018
-

- Another angle of the failure interface. Look out the red clay slid on top of the grey clay at the failure interface – March 7, 2018
I returned to the property again on March 19, 2018 to monitor the movement of the seawall breach. Just like last time, the initial slide continues to creep over my seawall and into the lake. The perimeter of the failure still remains as it was on March 1, 2018 with no spreading.
-
- Toledo Bend Seawall Failure – March 19, 2018
-
- Toledo Bend Seawall Failure – March 19, 2018
-
- Toledo Bend Seawall Failure – March 19, 2018
-
- Toledo Bend Seawall Failure – March 19, 2018
-
- Toledo Bend Seawall Failure – March 19, 2018
-
- Toledo Bend Seawall Failure – March 19, 2018
You may be asking, "Where is the person who built this seawall, Ricky Hobbs.". During the whole process that I have been trying to grapple with this seawall failure I have talked to Ricky Hobbs several times. On every occassion with the exception of one I have been told by Ricky Hobbs that he would "get back to me" in a few days, only for it to never happen. During my March 19 visit I happened to get a chance to bump into Mr. Hobbs as he was driving by. He got out of his truck and talked to my neighbor and I. During our conversation in front of my neighbor Ricky Hobbs vowed that he would "work with me" to get this issue resolved. I told him his cooperation would be appreciated and his help was desperately needed to fix this failure. Everything I say about this is only from the factual context of my experience with Ricky Hobbs. He did nothing to help me with the failure of the $75,000 seawall that he built only 8 years ago. In addition to these non-actions and empty promises, I also found that Ricky Hobbs is not a licensed contractor in the state of Louisiana, neither commercial or residential. I cannot find any record of him or any business he may own on the Louisiana Secretary of State website. Is this a negative review? Let's just say this is me recounting my experience and hoping the same thing doesn't happen to you. My advice to anyone who is thinking of building a seawall on Toledo Bend is to make sure your contractor is licensed and insured. Get proof of this before you ever hire them.
I returned again on March 22,2018 to monitor the seawall movement. Just like before, the original scab continues to creep into the lake, the failure perimeter remains the same.
-

- Toledo Bend Seawall Failure – March 22, 2018
-
- Toledo Bend Seawall Failure – March 22, 2018
-
- Toledo Bend Seawall Failure – March 22, 2018
April 3, 2018. A month has passed since the Toledo Bend seawall failed. In addition to determining the cause of the failure, this month has also been spent on rebuilding the seawall. I have weighed several different options including:
- Dumping rip-rap all over the top of the failed seawall - This would be the cheapest option and a pretty good option as well. The rip-rap would dramatically slow the erosion. It looks pretty good when it is spread nice and even. Some disadvantages of using rip-rap are the accumulation of debris, unsuitable for swimming or diving around, the attraction of snakes, and the need to replenish every year or so.
- Do nothing at all - This is hardly an option. With no seawall or barrier protecting it from the deep water wave action, the shoreline of the property would erode quickly and become a steep bluff. This option would affect my neighbors' because the erosion would eventually get behind their seawall and started tearing away at their property.
- Build a wooden seawall - This is what I had before the failure of the tension cable fasteners. I may have rebuild the seawall using this option if my contractor hadn't said some things that convinced me to rebuild using a vinyl seawall.
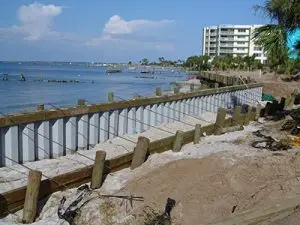
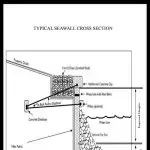
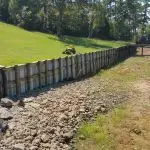
- Build a vinyl seawall - Rebuilding by building a vinyl seawall on my Toledo Bend property is ultimately the option I chose. One of my neighbors advised me against this stating that vinyl seawalls are prone to buckle or crack with time. I concur with what my neighbor says about this because I've seen vinyl seawalls first hand that were damaged just like she describes. I discussed this with my contractor and he was familar with vinyl seawall failures due to cracks and buckling. He stated that this is because people choose too thin of vinyl and do not build the seawall in a navy style configuration as recommended by the vinyl manufacturer. Below is a boilerplate drawing of a navy style seawall and an example of a navy style seawall in service.
-
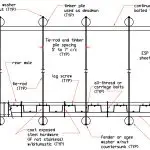
- Boilerplate Navy Style Seawall – plan view
-
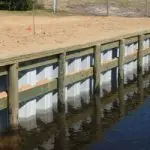
- navy style seawall
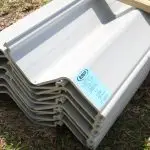
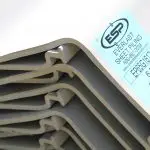
You might notice in the Boilerplate Navy Style Seawall drawing above that it does not use tension cables like my old seawall did. Instead it uses tension rods. This is a new trend in seawall technology. Even the original contractor, Ricky Hobbs, mentioned the other day that he no longer uses tension cables and instead uses tension rods.Here are some pictures of the vinyl my contractor chose for the project along with a spec sheet for this particular seawall vinyl. As you can see this is nearly 1/2 inch thick! Each sheet is 16' long. Given that the seawall will be above the water line approximately 3' and another 3' down to the mud line, the vinyl will be driven to a depth of approximately 10'. The original wooden sheets were only 10' long. This means that the original wooden sheets couldn't have been driven more than 2 to 4 feet into the ground. Not good! The pillings in front of the vinyl are 20' long and will be driven to 12' or refusal. The tieback rods are made of galvanized steel, and they are 20' long. My original pilings were only 14' long in total length. That means that the most they could have been driven into the ground is only 5 or 6 feet. Not good!everlast Seawall Vinyl esp 6.5 spec sheet
-
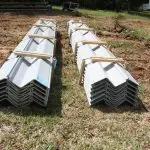
- everlast Seawall Vinyl esp 6.5
-
- everlast Seawall Vinyl esp 6.5
-
- everlast Seawall Vinyl esp 6.5
-
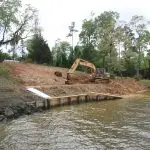
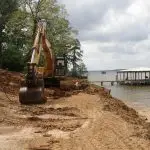
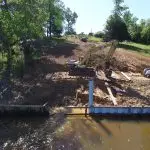
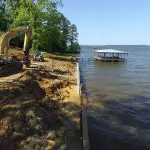
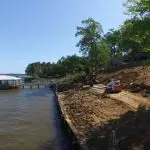
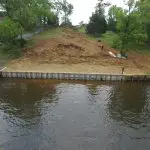
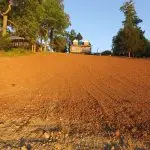
Below are the remainder of the images from April 3, 2018. As you can see we are having to dig out the old seawall and terrace just above it so that the new seawall hopefully won't have as much pressure on it as the old one.
-

- Toledo Bend Seawall Failure – April 3, 2018
-
- Toledo Bend Seawall Failure – April 3, 2018
-
- Toledo Bend Seawall Failure – April 3, 2018
-
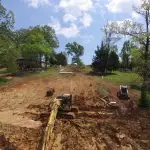
- Toledo Bend Seawall Failure – April 3, 2018
-
- Toledo Bend Seawall Failure – April 3, 2018
-
- Toledo Bend Seawall Failure – April 3, 2018
-
- Rebuiding the seawall and landscape. Fig tree still standing.
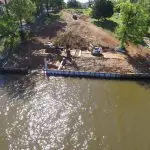
April 10, 2018. My contractor sent me these pictures of them installing the vinyl seawall at Toledo Bend. They said it was a good day and made a lot of progress driving the pilings and vinyl seawall.
-
- Installing the vinyl seawall at Toledo Bend
-
- Installing the vinyl seawall at Toledo Bend
-
- Toledo Bend vinyl seawall
As time goes on I will update this article until the seawall is built. As stated earlier this article is my account of events that have unfolded dealing with my seawall. Nothing contained herein is to be construed as advice in building a seawall or choosing a seawall contractor. That's my disclaimer, and I'm sticking to it!
Please post your questions/comments to the section below. All discussion is appreciated!
Here are some questions I have:
- Should I put a french drain in front of the seawall like the one in this image?
-
- Seawall with French drain
- update 4/11/18 - I posed this question to the licensed professional engineer who did my soil boring tests as follows: "What is your opinion on putting a french drain at the seawall (like the attached picture) or simply running everything over the top of the seawall?"And his answer was: "A french drain is really only a temporary solution. Within five to seven years, the fine particles from the surrounding soils flow into the gravel and plug it up to where it stops working. It would be cheaper and better to run everything over the sea wall."
-
- Should I put rip rap in front of the seawall when it is built?
- update 4/11/18 - My contractor thinks this would be a good idea to guard against bottom washing.
- update 4/14/18 - We likely won't put rip rap at the bottom of the seawall. The angle of the property is steep even in the water. We're afraid that the rip rap will slide and drag soil with it.
April 17, 2018 update. The seawall is over half way erected. We had a storm come through a couple of nights ago that really did a job on the unprotected area of my property. One thing I really learned during this video was the ineffectiveness of rip rap on steep slopes. Check out this rip rap that my neighbor installed on his property exactly two weeks ago:
-
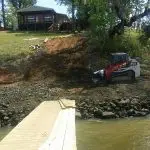
- My neighbor installing rip rap on his seawall on April 3, 2018
-
- My neighbor installing rip rap on his seawall on April 3, 2018
-
- My neighbor installing rip rap on his seawall on April 3, 2018
Now check out his seawall after the storm we had the other night. His rip rap is nearly all gone! When installing a rip rap seawall the base of your rocks should be three times the height, on a flat surface. The surface under the water at our seawall is sloped so agressively that I don't even recommend using rip rap as a barrier. Next time someone starts telling you how great rip rap is, ask them if the barrier surface is flat or sloped. The only rip rap I see holding up on Toledo Bend is on flat or very gently sloping surfaces.
-
- Just last week my neighbor installed new rip rap on his weakening seawall. We had a storm come in and wash it all away.
-
- Just last week my neighbor installed new rip rap on his weakening seawall. We had a storm come in and wash it all away.
-
- Just last week my neighbor installed new rip rap on his weakening seawall. We had a storm come in and wash it all away.
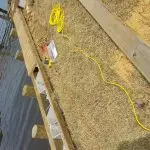
Here are the pictures of my seawall on this day. Work continues. Getting closer and closer.
-
- As of April 17, 2018 the seawall rebuild is a little over half-way done.
-
- A vinyl sheet ready to be driven by the excavator and vibratory hammer.
-
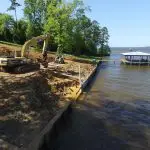
- Washing happens really fast when there is no protection from a seawall.
-
- Washing happens really fast when there is no protection from a seawall.
-
- The machinery has to stay back from the seawall at least 20 feet to avoid over-packing the soil or damaging the tieback system.
-
- The clay is so sticky and wet that the excavator must use wooden timber mats to avoid sliding and sinking.
-
- We had a bad storm a few nights ago. Heavy washing in the exposed area, but the new seawall protected the finished area.
Below are a couple of pictures of my neighbors property on the other side, to the south of me. When the seawall failed initially there was a section of about 5 or 10 feet of the seawall on her property that leaned over. Our seawall is connected becaused she used to own my property also. One could argue that my neighbor should be responsible for 5-10% of the cost of the seawall repair, but I didn't worry about it. My focus was to save my property from further damage. It was also my focus to make sure not to cause damage to my neighbors' properties by not fixing my seawall. My contractor met with my neighbor to the south of me and advised her that her seawall could be facing imminent failure, especially because it likely has failed fasterners in it just like mine. She was advised by my contractor to inspect her tension cables and replace the fasteners to hopefully avoid failure on her seawall. She has also been advised that the soil level at her seawall is too low and is likely building up hydrostatic pressure because the water cannot flow over the top.
-
- As you can see my neighbor’s seawall still has a lean to it. The seawall pilings are so short that standing it up any more could cause damage. As a courtesy we installed tieback reinforcements on two of her pilings. Protection for my seawall and a freebie for her.
-
- When the seawall failed a small amount of my neighbor’s seawall to the south of me was leaning. In my opinion my neighbor should have fixed her seawall at the same time as me. My contractor has warned her that failure on her seawall is imminent. He also has outlined some things she can do to protect her seawall, but so far none of that has been done.
Here is a video of the April 17 visit:
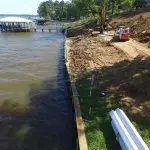
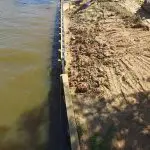
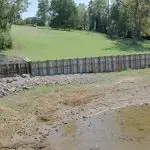
April 25, 2018 update. Today was a good day. The seawal is finished and the backfill dirt has been put behind the seawall. My contractor was walking with a bit of pep in his step today. I can tell he's feeling accomplished and complete.
-
- Now that the seawall is complete we have a lot fo dirt work to do up the hill.
-
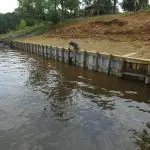
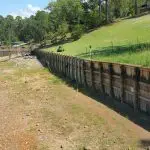
- Navy style seawall is complete and backfilled.
-
- So nice to see the property protected by a seawall again.
Here is a little video from the April 25, 2018 visit:
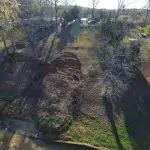
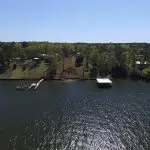
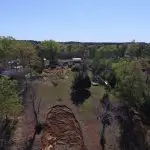
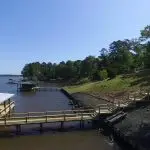
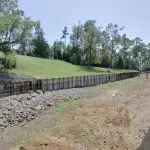
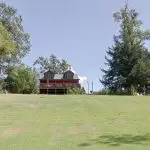
May 6, 2018 update. Finally after two months of hard effort the seawall is finished, and we can call this project a wrap. The hill above the seawall is dressed and ready for grass. Here are some picutres and video that were taken at the site today:
-
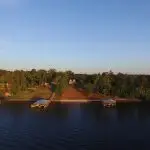
- Aerial view of the seawall and property.
-
- Brand new seawall, dressed lawn, and a little house on a hill.
-
- The soil uphill of the seawall is dressed and ready for grass. We lost all our grass, but the fig tree still stands.
February 25, 2019 update. It's been almost a year since the new seawall was built. Winter time is when the north wind hits the seawall with the biggest waves. Wwe had a big storm come through that knocked the cap boards off the seawall. I fixed this problem back ripping the cap boards down the center and placing them along the top of seawall where they look like piano keys. There is a gap between each of the slats that allows for water to spray through the top of the sewall instead of slamming against the top of a solid cap board. This reduces the hydrostatic pressure and damaging effects of wave action. It also breaks apart the waves to they cannot slam so hard behind the seawall and cause rapid erosion. Here's some before and after pictures of the seawall cap board damage from the storm:
-
- Here you can see the solid cap board on the seawall and the one that was damaged by the waves. Look at all that erosion behind the seawall.
-
- seawall after the storm
-
- This is the vinyl in the tieback area. If you look in here and it’s full of water then water might be getting behind the seawall.
-
- Notice how the ground is several inches below the cap? Not good! Soil and vegetation should be build up to where water can flow over the seawall and not pool up behind it.
-
- Notice how the ground is several inches below the cap? Not good! Soil and vegetation should be build up to where water can flow over the seawall and not pool up behind it.
-
- Little guy was a big help on the seawall cap board repair
-
- working into the night cutting boards for the seawall
-
- This picture shows the progress of the solid cap board removal and converting it into the individual caps with the space between them.
-
- Each cap has 4 long deck screws
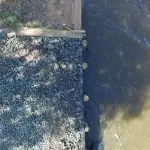
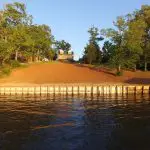
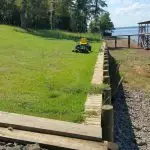
September 26, 2019 update. It's been almost a year and a half since the new seawall was built. During this year I have concentrated on keeping the soil at the top of the seawall level with the cap board. This allows water to run over the top of the seawall instead of behind it. I've also planted grass and have allowed it to grow long and eventually grow over the top of the seawall. During the latter part of the summer the Sabine River Authority (SRA) lowered the lake level so they could work on the dam. This also gives owners a chance to working on things like their seawall. I took the opportunity to get some fresh pictures and video from the part of my seawall facing the lakeside.
-
- You can see the remnants of the old seawall still sticking out of the ground. Before the lake level comes back up I plan to cut the remnants flush to the ground with my chainsaw.
-
- Notice how the rip rap in front of the seawall in the background tends to settle and recede away from the seawall.
-
- There is no telling what you may see on the bottom of the lake. Who the heck put that tractor tire down there?
-
- You cannot tie your boat to the seawall, but you can dry dock and walk on the bank.
-
- Rip rap in front of a seawall can help protect the seawall from wave action.
-
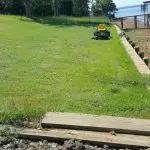
- The Jamur Zoysia grass is taking well on the seawall.
-
- The Jamur Zoysia grass is taking well on the seawall.
-
- Toledo Bend Cabin looking so pretty up there on the hill.
I hope you have found my article about building a seawall on Toledo Bend informative and interesting. I hope you never have to go through this experience of rebuilding a destroyed seawall on lakefront property. The process of repairing or replacing a failed seawall is both expensive and time-consuming. I learned a lot about building seawalls on Toledo Bend Lake with this experience. If you have any questions or comment please post them below!
If you would like to stay at my cabin please visit my calendar where you can rent Toledo Bend cabin or call me at (318) 272-0951.
If you would like to know who the contractor was who build my new seawall, it was Kenko Bulkhead and Marine Services. Here is the facebook page for Kenko Bulkhead and Marine Services
***